Showing posts with label craftrobo. Show all posts

Tuesday, October 16, 2012

Happy Birthday Dejah and Carousel Rubber Stamps

Feel free to just go check out the pretty pictures, but if you're curious how this came about by all means read on... ;)

My cricut has really taken over my cutting/crafting time since I got my Art Philosophy cartridge and since I added the Artiste one to my collection well it's been even more so.

The fact that I teach cricut classes has really been my excuse for using it so much and ignoring my poor KNK Groove and my craftrobo.

 I did use my craftrobo when I did my couisins baby announcements (more on those in another post) because of the ease of the print and cut feature on it. My KNK Groove got used a little when I did some vinyl text for a business for their vehicle.

 Well... Carousel Rubber Stamps where I teach most of my cricut classes at was celebrating their 18th birthday and the owner, Dejah's birthday is the same week as the store (we'll just say she was 29 again). ;) They hold demo days every month where the staff and guest instructors go in and demonstrate different products or techniques and on the weekend around the stores birthday they always have a larger demo day with cake and extra special make n takes and lots of fun to be had!! In addition this year they took all the cards that were brought in for the birthday of the store into a draw for a gift certificate. Of course I saw this as the perfect opportunity to use my software cutters. I really wanted the card to somehow symbolize the store and the fun had there, so I found a site that has PDF eBooks of pop up card patterns, one of which was a 3D carousel or merry-go-round. Perfect!!

I purchased the eBook and opened my funtime software to import the PDF only to discover that it was a secured PDF and funtime would not import it... grrrrrrr..... oh well.. KNK Studio to the rescue!! I opened KNK Studio and imported it no problem! :) After cleaning up the file a little bit here and there I cut out the 28 pieces required to assemble the carousel. In case at this point you're wondering what site I got the file from it was amazingpopup.com .

I used my gold pen to edge every piece in gold and then put it all together (took quite a while to really figure it out as I somehow had it backwards to what it should have been using the directions and had to take it all apart and do it again). I then realized I hadn't really paid any attention to the size of this template as sized how it is in the ebook you would need a card that was 8 1/4" x 7 with the fold being on the 8 1/4" side, this means you'd need 14" paper for your card base... (at least if you wanted it to actually be hidden inside thast is). Oh well, my gold pen made a bit of a mess on the first one anyways (note to self use this pen more often or it doesn't work properly right away)... resized the template and cut to fit a card 6 1/2" x 5 1/4"  much better. I also used thicker cardstock this time so the pieces were a little more durable.

Now nobody worry, my son quickly claimed the first one after all the work I spent on it to display on his table in his room as "Mommy, I don't like this card... I love it!"

Okay so, second one complete, card base cut, decorate front of card, go to decorate the inside... gold pen explosion everywhere!! 1 year old daughter awakens from her nap, I bring her out sand of course she immediately puts her hands in the gold pen explosion and starts making pretty handprints all over!! Thank goodness for rubbing alcohol in a spray bottle as I was able to clean the floor quickly this way, and spray a paper towel to use to clean her up.

I look at the clock and ACK!!! the store is closing and my card isn't over there yet. Quick call to the store to make sure they're still there and she assures me that there are still a few people there at the store so they will be a little while longer there. I look at my blank inside of the card (with the exception of my 3D carousel) and sigh as there is no way I have time to decorate the inside with gold ink and some stamps now (considering I have no idea where the stamps I would think to use on it are at the moment).. Oh well, hopefully noone will notice as they'll be distracted by the carousel right?!?!

If you made it through all that wow, thanks for your patience and I seriously hope the laugh at my disaster was worth all that reading. LOL

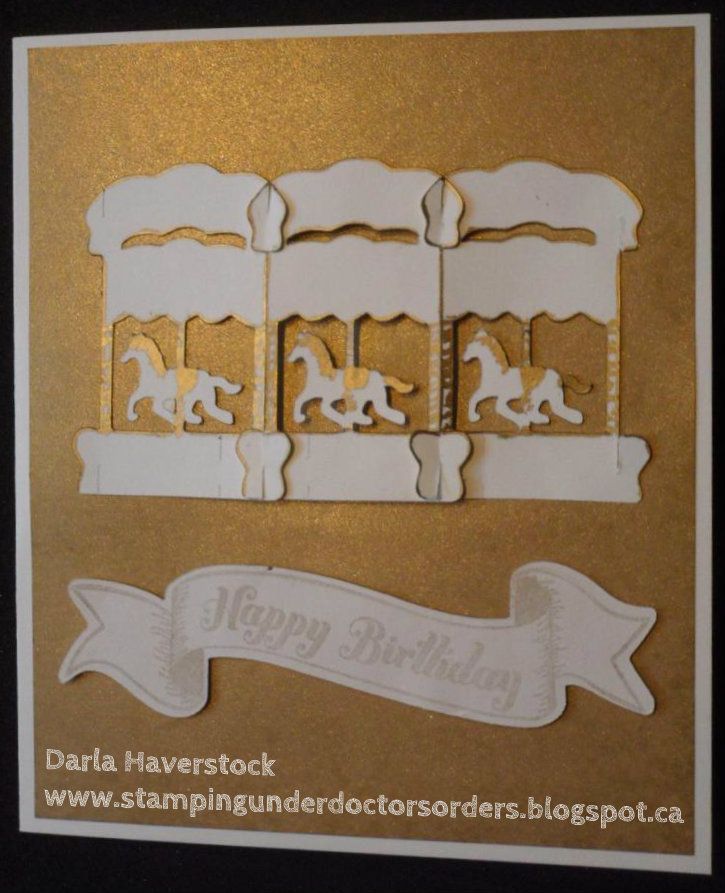
Without further ado... here is what I came up with:


oh and yes you caught me... I did use my cricut and the new Artiste cricut cartridge and stamps that come bundled with it for the Happy Birthday banner sentiment. 

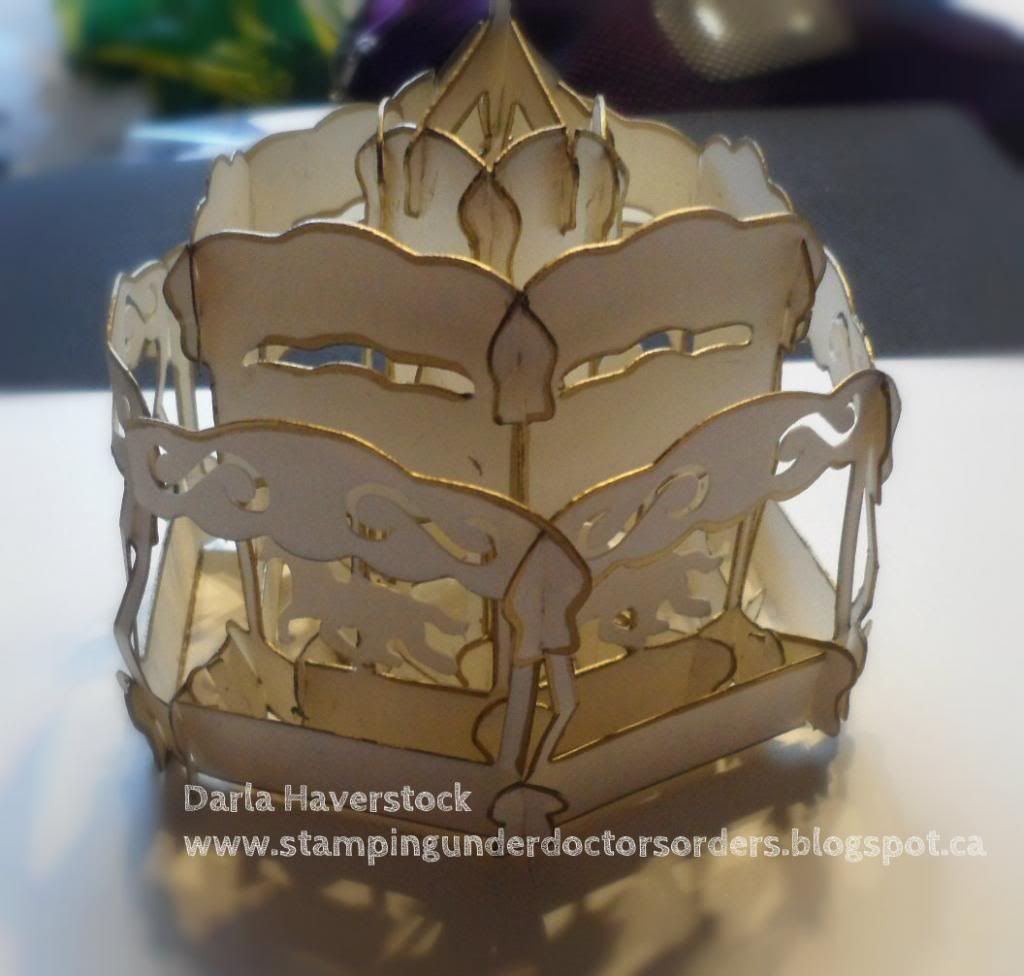
and a few different shots of the inside:

see my blank inside around it?? :(


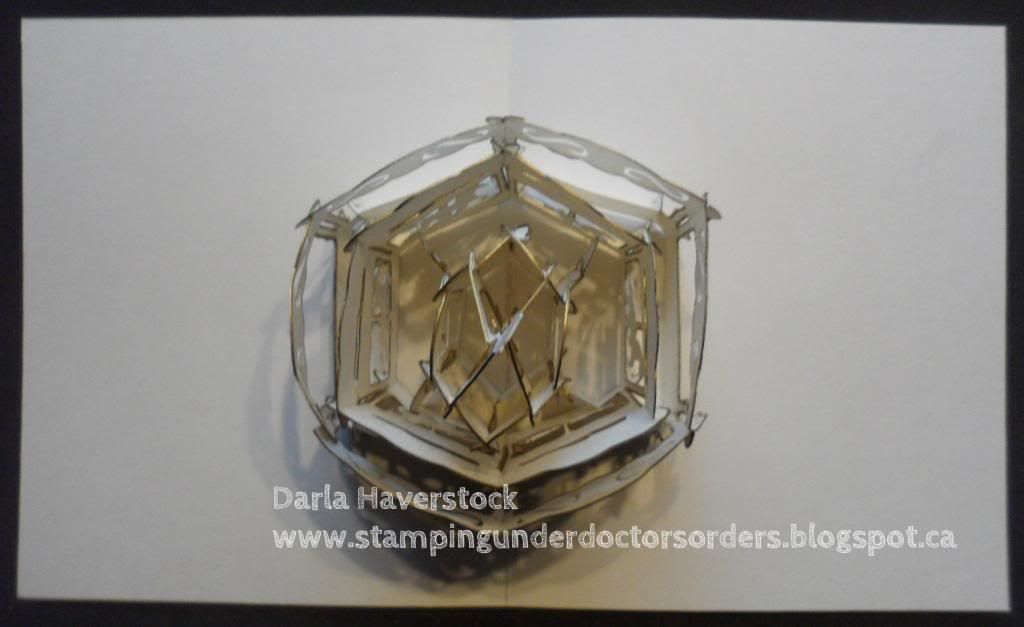
..and from the top


What do you think? I  have to say I LOVED this one!! It won't be one I'll ever mass produce as it was VERY time consuming but as a stunning card for a very special person I will definitely do this again.

Happy Birthday Dejah and Carousel Rubber Stamps!!

Monday, September 19, 2011

Birthday card for my mom

So my moms birthday was in March... So I'm really late posting this and honestly hadn't realized I didn't yet until a coworker of mine who I had shown the pictures of it went looking for it here to see it again, couldn't find it and asked me to see it again. Oops.
I promise to get better at this whole posting thing... Really!!! Lol
I bought this cut file but I won't tell you where as I wasn't impressed... This end result is only after countless hours tweaking the file!!! The round part was jagged at first and the doors didn't match up perfectly and the part that goes between the front and back to give it dimension well... After cutting 5 or 6 then manually cutting them amd gluing sections of them and UGH now I remember why I didn't post this... By the time I finished it I just had no desire to look at it any more to write the post!

Well, in the end after all my fixing I was very happy with the result!!

Thursday, May 19, 2011

Legoman placecards

EDITING THIS TO ADD: Thanks to an online friend from many different yahoo groups we belong in together Trisha this is also now available in SVG and PDF. :)

These are the placecards I made for the wedding I'm standing in for my friend in Friday. The wedding is Lego and concert themed. The tables instead of numbers are bands and she did scrapbook pages of concerts they've been to so instead of sitting at table 9 you sit at table metallica and it's a scrapbook page with pictures of them at the concert and a little write up about it.


I made 88 in total and there are 7 different Legoman pictures. The top of the block is embossed with an embossing folder I made from a piece of cereal box. She's putting a couple little Lego block candies in each box as well.


Very happy with how they turned out!!

I have the file in WPC, DXF, KNK and .STUDIO so far...

Please do NOT share this file without my permission, however feel free to send anyone here to my blog to download it for themselves. For personal use ONLY!!!!!!

I may be able to convert to another format if you want it... just ask and I'll try.


Please do NOT share this file without my permission, however feel free to send anyone here to my blog to download it for themselves. For personal use ONLY!!!!!!

Please do NOT share this file without my permission, however feel free to send anyone here to my blog to download it for themselves. For personal use ONLY!!!!!!


Saturday, April 9, 2011

Easter Eggstravaganza Blog Hop

Welcome to my Blog and the Easter Eggstravaganza Blog Hop! If you've come from visiting Kacee - http://youhadmeatscrap.blogspot.com/ , you're in the right place. If you were just looking at my blog and want to play along with our blog hopping fun, you can start at the beginning at http://nadiasbeautifulmess.blogspot.com/. This blog hop is all about creating something sweet for your Easter celebrations. We hope you find inspirations and plenty of ideas to spice up your holiday :)

Anyone that knows me knows that I am not a baker or cook of any sort for that matter so..... a paper cupcake it is. I kept the colours very Easter like (there was supposed to be more Easter themed stuff for this post but well... more on that later), although with this sentiment it could really be used for all sorts of things. Most was done with my craft robo cutter (exceptions of the sentiment - Gina K. Designs, and the punched border - Fiskars oh and the image was coloured in with my memento markers although the image itself was drawn with my craft robo sketch pen). The designs are not my originals but are from the Silhouette online store silhouetteonlinestore.com .

I have to tell you though that I did TRY to bake real cupcakes with my 2 year old this week for the hop.... but they didn't "puff" up properly (probably because he kept eating the batter so they weren't as full as they should've been to begin with LOL) and then we tried a batch of cookies.... but we had a potty emergency and they got just a little too close to burnt for me to want to take a picture and post. The cupcakes were going to be those really cute ones with the little nests on top made of aero bar pieces and mini eggs.

We also decorated some real eggs that I was going to place around the project as decoration however.... well... lets just say I didn't think smashed egg shells in different colours would have the same effect! Also, my DH had a nail bounce through the side of the pieces of wood he was nailing together for our new linen closet he's making and through 1 finger into the bone of the next so after a full day in emerg having xrays taken and then having them yank it out and what have you I just didn't have time to make new ones to replace the smashed egg shells with.  He is just fine by the way although his pride is very hurt and he's mad at himself more than anything. He was determined to finish the project this weekend and now will not be using his hand at all this weekend.

Well.. that's enough babble from me.... here's my project: (make sure you check out ALL the stops on the hop... you might find some candy along the way )


 Here's one of the cupcake out of the wrapper.


I hope you enjoyed my project. Thank you for visiting my blog. Your next stop is Amber - http://pixiperfectcreations.blogspot.com/ . Below is a list of all blog participants in case you get lost:

Nadia - http://nadiasbeautifulmess.blogspot.com/


Giselle - http://crossmyheartpapercrafts.blogspot.com/

Donna - http://donnasdreamworks.blogspot.com/

Yolonda - http://www.craftyscentiments.blogspot.com/

Jennifer - http://www.craftycardgallery.blogspot.com/

Kim - http://rickettscricuts.blogspot.com/

Damaris - http://www.latinnydoll.blogspot.com/

Melanie - http://inlovewithabug.blogspot.com/

Jazmin - http://JazzysCards.blogspot.com/

Monica (Stampin Daisies) - http://www.stampindaisies.com/

Gabriela - http://www.sheinksalot.blogspot.com/

Kacee - http://youhadmeatscrap.blogspot.com/

Darla - http://www.stampingunderdoctorsorders.blogspot.com/   <-----YOU ARE HERE!!

Amber - http://pixiperfectcreations.blogspot.com/

Sylvia - http://www.bellascrapbookdesigns.blogspot.com/

Monica F- http://simplycricutting.blogspot.com/

Rebecca - http://www.creationswithbecka.blogspot.com/

Carrie - http://paperglitterstamps.blogspot.com/

Patricia - http://creativediva98.blogspot.com/

  
Get widget