Wednesday, May 29, 2013

Heart in your pocket Sketch #5

When you're all done checking out my project please scroll down to the bottom of my post where you will find links for all the other Design Teams creations as well as a direct link to this weeks sketch with the current entries so far as they are fantastic! :)

Today I have a card for you made using Sketch #5 from Atlantic Hearts Sketch Challenge blog.

I have to admit that I made what I consider to be the biggest mistake you can ever make with the sketch this week. I looked at the creations by the other design team before completely committing to my own. Of course 2 of the other design team members had done something very similar to what my original plan was.

I was stumped! okay.. so that might be a bit of an exaggeration since I was only "stumped" for about a minute.

I looked over at my children drawing (they usually create projects while mommy thinks about hers and sometimes even manages to create) at the table in front of me, my 4 year old son, Michael had drawn a picture of a heart and was working on cutting it out. I asked him what the heart was for and his answer "It's for you to use on your card that you're going to make.", "oh is it?" I replied (now desperately trying to think of either how I was going to incorporate it in or a really good excuse why I couldn't), "yes" he said "it's a heart to go in your pocket so you can carry it with you for all time". DING!! Light bulb went on immediately. Daddy is being deployed in July for 6 months so this was PERFECT! Not only had he completed the idea (he had seen me working on a pocket card earlier for something else and assumed it was what I was making for this) but he had also come up with my sentiment for inside.

What do you all think? It met his complete approval, which is rare.


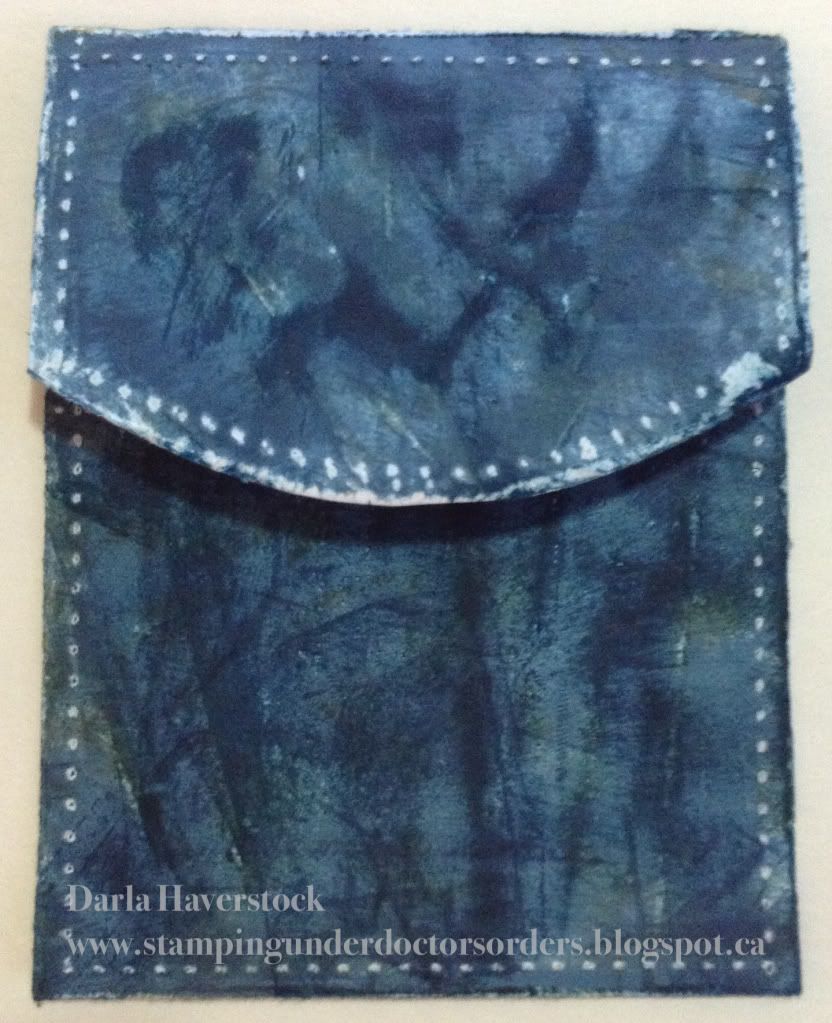
I had to reinforce the top flap and middle section with an extra piece of cardstock because I sanded it to distress it and then inked and then sanded some more and I had already scored the cardstock and folded it so it started to rip right through along the fold line. Now it's extra sturdy though and I know it won't come apart.

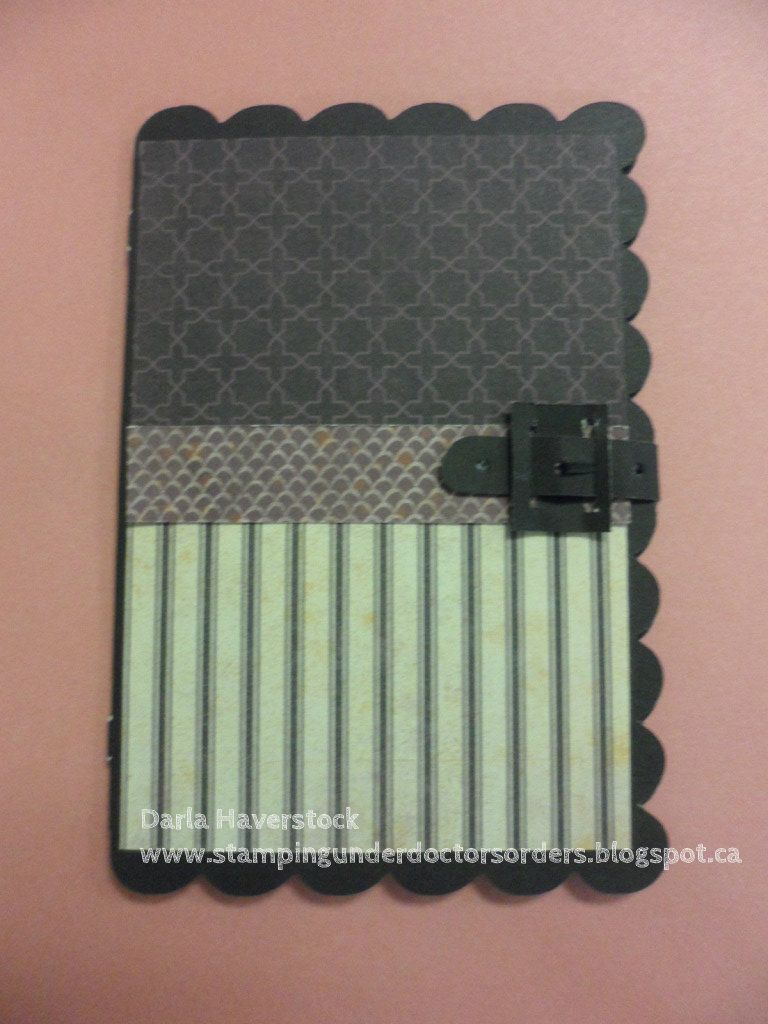
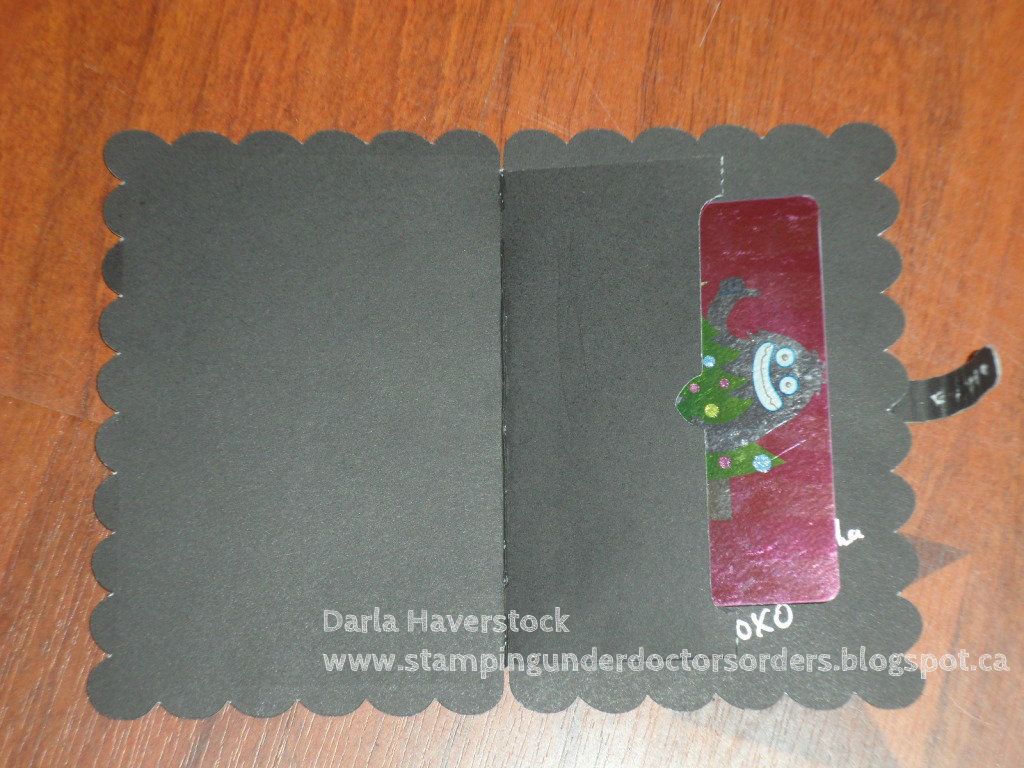
The base is Pacifica cardstock cut to 4.25" x 12" and scored at 3.5" and 9". I used a cd to trace the rounded edge and then cut it out. The entire thing was sanded (put your cardstock over the edge of a table if you want to create sanded lines to create a wrinkled and worn effect instead of an even sanding), distressed with my Edge Distresser along the edges as well to really rough them up like a comfy pair of jeans, then I took my desert sand, Pacifica and Indian Corn Blue ink pads and brushed them lightly across everything.

The shorter of the two flaps was glued to the middle only along the side to create a pocket. I then used a ruler for the straight edges and lightly drew a pencil line .25" in all the way around and just eye-balled it for the curved edge and used my scor-buddy and a scor-bug embosser to emboss little dots all the way around the edge quickly (I had to put it on a piece of cardboard and just follow the curved line by hand). Flip to the front side and sand to reveal the white core of the cardstock for the "stitching". The sentiment is just hand written with a Journaling Pen. 


Please go check out the rest of the Design Teams creations here and the Sketch I used and all the current entries here.

Products Used:

Wednesday, May 22, 2013

Beautiful! Creation for Sketch #4

I can't believe we're already on sketch #4 over at Atlantic Hearts Sketch Challenge (AHSC) blog. 4 weeks have just flown by! I have been digitizing sketches like crazy as we want to have as many ready for our Design Team as far ahead of time as possible and since Michelle has already hand drawn 39 pages of sketches at 2 or 3 per page for me to digitize there is no shortage of ones to be done. ;)

I do have a question for all of you though... I am digitizing them in one of my cutting software programs which means I have an actual cut file for every sketch in SVG format. My question is if any of you would be interested in me sharing that cut file each week with the sketch? Let me know in a comment here or over on the AHSC blog and if there are enough requests I will work on getting them uploaded somewhere to share.

Now, onto what you really came here for... my card! :)


I had this wonderful flower that I made with Lisa as a make and take at the Crop for the Cure earlier this month and I have been dying to use it on something. This sketch was perfect. I dug out some of thelimited edition Dream Pop paper that you can get for $10 with every $35 this month and cut a 4" x 5.25" piece to include the banners/sentiment which is on one of the patterns. Stuck my layer onto a Hollyhock card base and then just adhered my flower on top. Finished. I just love the glimmer and shimmer to this beautiful flower and better yet how easy this card was when paired with this fantastic patterned paper.

Products Used:

Wednesday, May 15, 2013

Sketch #3 for Atlantic Hearts Sketch Challenge

Today we are sharing the Design Teams creations as well as the Top 3 from last weeks entries over at Atlantic Hearts Sketch Challenge. Go on over and check it out... after you read this post of course. ;)

My card today follows the sketch almost exactly. I am lucky enough to have the sketch designer as a good friend. Michelle who made this sketch actually made this sketch with my love of watercolouring backgrounds in mind. That said, I am actually not very happy with my background and window scene I did today and I will end up re-visiting this one at a later date to do a better window scene.

I used my poor neglected craft robo for this as I have been using the Funtime software to digitize the sketches that Michelle draws by hand to post for you all so I already had a cut file made for this one (I know.. cheating!!). My craft robo is feeling much more loved now that it actually got to "cut" one of the designs I have been making with the software lately.


The whole front panel is raised on foam tape and the window box is raised up again with foam tape from there. I used Dakota paper for the panel and the watercolour pencils for the window scene. The sentiment is from B1392 Key Moments and is stamped in Chocolate ink. I cut apart one of the flourishes from a Sparkles Flourishes for the bling.

I also shared this card yesterday using the same sketch if you want to check the details for that out you can go here.


Now go on over to the sketch challenge blog and check out everyone elses creations.

PRODUCTS USED:


Tuesday, May 14, 2013

Father’s Day Card

I have this fun card on the Card a Day Blog today.

My husband and my Dad are both very handy and spend lots of time building things or fixing things for people (including me). Their to-do lists often get very very long and both are kind hearted enough to put their to-do lists before themselves (most of the time).

I decided to use the concept of putting away the to-do list as the starting point, added in the current sketch for this week from my new co-hosted sketch challenge blog Atlantic Hearts Sketch Challenge (hint hint wink wink… go check it out!!) and voila!


Now, as much as I’d love to show you the inside of this card I can’t… for 2 reasons…
  1. My husband and my Dad both read my blog and although I’m not sure who’s card this will be I want at least part of it to be a surprise
  2. It’s not finished yet.. sssshhhhhh…. I have big BIG plans for it though and I promise to share it with you again after I give it to them.
Winking smile

DIRECTIONS:

This card is actually a full letter sized sheet of paper (8.5” x 11”) folded in half so it’s a large card.
The bottom piece is 1.25” x 8.5” and is supposed to be the workbench in the garage. The corkboard piece which is really just a piece of Kraft cardstock that I sponged some Desert Sand ink on and distressed the edges with Chocolate a little bit is 3.5” x 3.75”. The drawers are 1.25” x 4.25” and the raised panel on the drawers are 1” x 4”.

I used one of my home made embossing folders to emboss the drawer panels.
*I make my home made embossing folders 5 different ways but this particular one is a cut from the Paper Lace 2 cricut cartridge and is cut out of stencil plastic. To use this type I just use the same sandwich as you would use to emboss a spellbinder die plus an extra piece of thick cardstock for a shim.
I brushed all of the black cardstock with some Gunmetal and Pewter metallic rub-ons (it's like a wax paste and s awesome for this type of project). I then took my silver Encore ink pad and lightly brushed it directly on the drawer fronts to ink the raised embossing.

I made a quick to-do list (which by the way is an actual to-do list here of my husbands that I re-wrote small and then chopped most of it off to make it fit behind the drawer). My post it note is just a scrap of white I had laying on my desk and my thumb tack is a tiny silver brad.

They don’t make sentiments this large for cards and I didn’t feel like piecing all the individual letters to spell it out. I couldn’t print it since it’s black cardstock and you can’t print white (unless you have a very high end printing company printer that actually has white ink in it). All this to tell you I hand wrote all the sentiments for this one. hahaha

Wednesday, May 8, 2013

Wallet Card for Sketch #2 - Atlantic Hearts Sketch Challenge

Here is my creation for this weeks sketch over at our new Atlantic Hearts Sketch Challenge Blog.

I needed a birthday card for my cousin and this sketch inspired a blazer jacket type feel (after of course I managed to get the Santa belt image out of my head.. you all know how much I LOVE making Christmas cards but figured I'd spare you for at least another month or so).

The card base is cut from the Artiste Cricut Cartridge and the belt and loop I made by hand for no reason other than I had packed my cricut stuff away for a crop before I finished up the card.


Of course I couldn't leave well enough alone and went at it with my silver pen to make it look like this...


The inside has the space for a gift card to go in and since I picked up the gift card on the way over I just stuck one of the kids Chapters gift cards from Christmas in there for the picture. I used the same silver pen to write my greeting inside as well. 

Wednesday, May 1, 2013

Groovy Birthday for Atlantic Hearts Sketch Challenge #1

Here is my creation for Sketch #1 over at our new blog Atlantic Hearts Sketch Challenge.


I used the new Dream Pop paper pack available starting today until the end of the month for just $10 with every $35 order. Let me just say that the papers in this pack are gorgeous!! Talk to your personal CTMH consultant as well if you get this pack to get a complimentary workshop guide to go with it as well.

I used honey for my card base, sorbet for the bottom piece and the Dream Pop paper on top as well as the zip strip off of the same Dream Pop paper.

I used some Dimensional Element Stars and inked them with honey pigment ink and then a little bit of slate pigment around the edges.

The sentiment is partially handwritten using a marker and the word "GROOVY" is made from the A Typeface stamp set and stamped using slate ink.

Please go check out my blog co-hosts design as well as all the fantastic entries so far in the challenge over at our new blog Atlantic Hearts Sketch Challenge. We'd love for you to play along with us and maybe even join our design team?! :)


Get widget