Showing posts with label CTMH. Show all posts

Wednesday, August 20, 2014

Thinking outside the box

I have to start this post off by showing you the Stamp of the Month for this month so you know where this started from...


Last night a fellow consultant (thank you Dominique) posted this picture where she was trying to turn the owl stamp into a raccoon but felt something just wasn't quite right..


Me being the kind of person I am, saw this as a challenge.
I decided to do what I do with all things that don't quite look right... I immediately turned it upside down. It's a strange trick for your brain to be forced to see it differently.

I then of course had to immediately go draw all over it with the drawing program in my phone. (Oh did I mention it was almost midnight and I was in bed but couldn't sleep? LOL)

Here's what I came up with...

What do you think? 

I also want to show you the owl could also be a sock monkey... Check out Dominique's post about that here


With a minimum qualifying purchase, get your D-size Stamp of the Month set for a discounted price! Add the stamp set to your cart on this page at full retail price or, with your qualifying order, add it at checkout for the promotional price.

Friday, May 16, 2014

Fast, cheap and easy!

Now normally that would not make a good title on a woman entrepreneurs blog....

Of course it's a great title when it has to do with the time and cost involved in making this great necklace!

This cost around $10 and I literally completed this in under 5 minutes! 

Now of course the phrase would have been in there straight if I didn't stick it in while walking away from the craft table at the Rediscover Close To My Heart event to get a group photo taken with everyone who was there from our team but it truly shows just how easy it was. 

You can see that I am wiping off the excess liquid glass from the glass cover in the group photo. LOL

I also have to share the funny story behind my choice of image in the necklace. 

Back in February I attended a Women's Wellness retreat for military family members (which was an absolutely incredible, life changing experience). 

A close friend and myself actually helped create a lot if the decoration, handouts and workshop stuff ahead of time including clothing items made from paper for everyone to write their worries on to hang on a clothesline between two trees for the weekend, a map of Canada with speech bubbles to record various postings and events that have happened as part of each persons story, a mini tag album and some cards for everyone to complete and more....

We showed up a day before to help the facilitators set everything up and while asking if there is anything else we could do my friend was handed a large stack of paper with leaves printed on them and a pair of scissors... 
Yup... You can imagine the look! 
Us who just cut using two Cricuts (some days even used 3) for weeks leading up to this and now we are given scissors with printed images to cut out???

Needless to say the printed images were handed back to the facilitator and the 60+ page sized leaves were cut out in a matter of about 30 minutes and on nicely patterned paper too!! LOL

The facilitator was then dubbed "she who runs with scissors".

Now you can understand why when staring at a large table covered in a massive variety of little images from Close To My Heart that make this project so ridiculously easy my choice was obvious and a gift for the facilitator "She who runs with Scissors" was made. 

Thursday, April 17, 2014

Ivy Lane Cards

After cutting and assembling the Ivy Lane card kit I realized I still had enough paper to make a few more with just a little more colonial white added.

I still used the cuts from the guide but used them a bit different from what the guide that comes with the kit says to.


I taught these cards at the Crop for the Cure that just happened last weekend and will be teaching them again at a crop put on by Scrapbookingcafeonline.ca May 9, 10, 11 weekend. 

What do you think? 

Wednesday, April 16, 2014

My new venture and a teapot!

I just joined Steeped Tea Inc as their 3850th independent consultant in Canada on a March 27 and I am sooooo excited about it! 

Here's a photo of Michael and I while we waited for the very first tea from the consultant kit to steep. He insists that I must now wear my apron every time I make tea because that's what professional tea makers do. LOL


Their teas are divine, sales quotas are easily reached just by ordering the amount I personally drink and they have a fundraising program that is amazing (pays 40% to the fundraiser... Ask me for details) I get to have tea parties for my job and my kids love helping me do my job too! What could possibly be better?!?!

This past weekend I was at a Crop for the Cure which was an absolute blast!! The people were awesome, made great new friends, reconnected with some others and had an absolutely wonderful time!! I even won a trip to the spa (though I passed it on to someone else since I live 5 hours away from where the crop and the spa were). 

What does this have to do with my new venture???
Well, I taught 4 different classes while I was there but still managed to fit in a little crafting for myself as well including this awesome 3 D teapot from SVGcuts that I will be giving out with a tea sample in it to all of my hosts/hostesses as a thank you for hosting. 


I am in love with it!! 

I think I may mod podge them though to make them more durable oh and add some pearls around the edge of the lid and on the base. Thoughts??

Want one?? Book a party with me and you'll get one for your very own!! :) 
Even better is that you'll earn FREE delicious product when you host a party as well. Talk about a win win!!

Now I also have to share a few pictures of my business partners sharing this wonderful product with me because they are simply too adorable not to share with you (and yes I'm completely biased). 

Here's a picture of the very first cup of tea we made and you can see who claimed it! 

Of course Samantha decided to be the party hostess the next time and being the   hostess with the mostest (my dad is probably rolling his eyes at that bad grammar.. Sorry dad I had to!) she pulled out her tea set and even served us some plastic cookies and snacks. 


Okay so since this IS my paper crafting blog... Let me remind you again what this post has to so with paper.... 


It is made with White Daisy cardstock and Ariana patterned paper. :) You can find the cut file I used over at SVGcuts here

Want to see a few other things I made at the crop??? Come back!! I promise to share more over the next few days. Yeah, I know... Tease!! Already enough photos in this post though don't you think??

Happy sipping! Enjoy!

Saturday, March 22, 2014

Cascade Card

Here is a cascade card I made with a great crafty friend of mine Jolene.

I cut and scored the card base, she cut the layers to fit. I coloured and cut out the images and she decided on the placement of them. 

We were very happy with how this turned out.


I will be teaching this one as a class both at the Crop For The Cure in Cape Breton, NS the April 11, 2014 weekend and the Scrapbooking Cafe Crop in Truro, NS May 9, 2014 weekend.
Class fee is $5 with everything supplied except adhesive. 10 people per class.

We used Twilight cardstock, Timberline paper and white daisy cardstock to stamp on. The stamps I used were D1579 Windy Day and D1581 Give a Lift with Crystal Blue ink.

Jolene and I also have our own full day scrapbooking crop in Halifax for just $20!! A large portion of the proceeds go to support the Halifax Military Family Resource Center. Come check it out and join us! More info on it here.

Products Used:

Wednesday, November 20, 2013

Santa Baby - Sketch 30

I have to tell you when Michelle sent me her hand sketched version of this as a scanned picture of it I opened it and it was sideways. The card I made is what immediately came to mind and I had a lot of fun making this one. 


It is an A2 gate-fold card in Cranberry cardstock that I took some scissors (gasp... I know.. I so very rarely cut anything by hand) I cut the top into a heart shape leaving the sides intact at the folds on each side. then I cut off the bottom corners rounding a bit rather than simply cutting straight and lastly leaving a little of the folded edge attached at the top and bottom I cut away some of the middle of each side of the card.

I stamped the swirls from Love Life in versamark and heat embossed them with Winter Wonderland embossing powder (this powder has silver glitter in it but you can't see it at all in the photo). I then took a liquid applique pen and drew on the edges of the bottom and the top, waited for it to dry and then heated it so it would puff up. I used my crop-o-dile to make the lacing holes on the card edges where they meet in the middle (I held them together and punched both at the same time so they were even). The ribbon is laced as 2 separate pieces going only on one side with each piece and then tied inside the card on the bottom and outside at the top. I did it this way so the card could still easily be opened.


I'd love for you to go on over to check out what the rest of the Atlantic Hearts Sketch Challenge Design Team has in store for you today using this sketch HERE.

I'd really love if you checked out the entries so far this week and played along with us HERE 

Wednesday, August 7, 2013

Beware Sketch 15

Make sure you check out the  rest of the Design Teams creations and Tops 3 from last weeks sketch (after you read my post of course or at least check out the card I made) so you don't miss out on some truly awesome creations! I am so very proud of our design team, they make my heart happy.

I always try to make cards for my sons preschool class and friends and family from both my kids (my youngest isn't in preschool or anything yet) for all the holidays.

This year I need to make sure I start them just a little bit earlier than usual to ensure they get made on time for each holiday.

That said when I was looking through my new Close To My Heart Artbooking cricut cartridge I saw a few images and had this weeks sketch in the back of my mind for this years Halloween cards. Now I know you're probably not ready to start your Halloween cards just yet but I bet over the next month you're going to start trying to (or after the fact will wish you started to so you didn't end up doing them last minute like I usually do) figure out what you're going to make so you can get all the supplies you'll need.

Check out what I came up with!

The card base is 6" square of cranberry cardstock and then the black is a 5.5" square. I used the Artbooking cartridge to cut the spider web overlay at 5.5" from whisper cardstock which I then sanded a bit and added some glitz gel randomly on it (not sure if you can pick out the glitter in the photo or not but trust me.. in real life the web has a definite sparkle). The spider was cut with the dial size set at 11.5" (this cartridge is set up so that the pieces will cut to make the layout pictured in the handbook by setting the dial size once and cutting all of your pieces hence the large dial size for this spider... I also could have used real dial size and cut it somewhere around 3" since that's how big he ended up). I cut the "Beware" at 1" with real dial size on (I think it would have cut this size had I just left my dial size on 5.5" and not used Real Dial Size as well).

I covered my spider with bonding memories glue using the jumbo glue stick and poured some black flocking on him. I love that this card has the fuzzy spider and the shimmery web. The spider is then positioned with the "Beware" first and then the word and spider are popped up together with foam tape.


Please head over and check out what the rest of the design team made with this weeks sketch as well as the Top 3 from Sketch 14 HERE

Products Used:

Saturday, July 13, 2013

Sweet Life Blog Hop


Welcome to our July Stamp of the Month Blog Hop! This month's stamp from Close to My Heart is "Sweet Life" and is available exclusively through your Close to My Heart consultant from July 1 - 31, 2013. You can purchase this stamp set for only $5 with a qualifying purchase. 


 If you have just hopped onto myblog, please start at the beginning at Lucy's blog – Love 2 Create. If you came from Lucy's blog – Love 2 Create then you are in the right place!

My card today uses the peaches and one of the sentiments from this set. I used colonial white as my card base and for my layers and coloured my images using buttercup, sorbet and sweet leaf alcohol markers as well as a chocolate brown marker from the old style since that's what I had. I used Buzz & Bumble B&T and I inked the edges of everything except the card base with Goldrush ink.


I am very happy with how this card turned out. What do you think?

You can see another card I made using this stamp set that I posted the other day HERE.

Your next stop on our "Sweet Life" hop is Theo of Celebrate Crafts.

Products Used:


Here is the entire line up in case you get lost along the way. :)

  1. Lucy ~ Love 2 Create  
  2. Darla ~ Caution: Crafting is Contagious 
  3. Theo ~ Celebrate Crafts 
  4. Jennifer ~ 4 Hearts Scrapbooking 
  5. Mary Ellen ~ Cr8ive ME 
  6. Cat ~ Catscrapbooking 
  7. Rebecca - Show Me Scrapping   
  8. Heather - Paper Crafter Anonymous 


 Thanks for hopping along with us - we hope we were able to inspire you.

Monday, July 8, 2013

Exciting news!

Okay, I don't want to distract you too much and have you miss out on any retiring products.. so before I begin here's you reminder:

Don't forget with a new idea book coming out August 1st there will be lots of products retiring! If you had your eye on something and haven't ordered it yet do it before it's gone! If you want to know if the items you're looking at are retiring or not contact me with your list and I will let you know. :)

You can order by contacting me or through my website HERE. Make sure you join my open gathering and I will send you a little goody as well.

okay.. warning over.. now onto my exciting news!

Have you heard the news? No?
Close To My Heart has introduced a new cricut cartridge bundle that will be available for customers August 1st!

Bundled with 3 sheets of colour ready dimensional elements and 3 D size stamp sets!


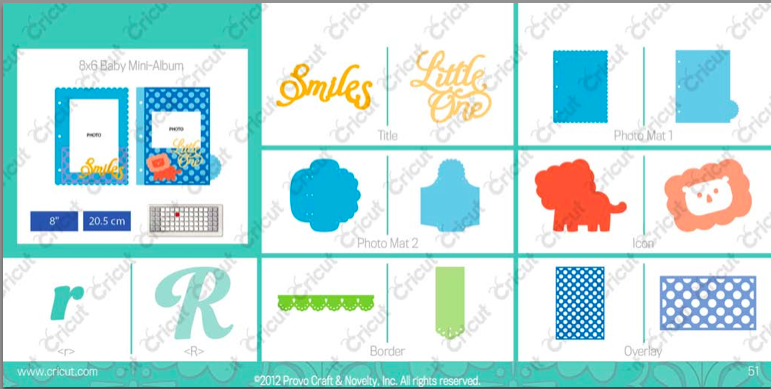
There are page lace overlays (would make a great card front as well), scrapbook layouts already thought out for you just set your dial size to 11" cut assemble and add photos (of course you could also switch them up from the predesigned layout and use them for MANY more different ones as well), mini albums, titles, card fronts, envelopes, file folders, a complete font and much much more!

I am of course offering a special for you! 
Order the all new Artbooking cartridge through me and receive 2 FREE cricut blades (your choice of regular or deep cut), a copy of the new idea book and a small stamp set as a token of my appreciation. You will also qualify for the stamp of the month and any current promotion that may be going on as well.

Also, if you are local and order before July 20 I will have it waiting here for you to pick up on August 1st.

Of course you can always get it before August 1st by joining my team for just $49 and receive over $155 worth of stuff (see the kit HERE), get a minimum of 22% discount on all of your CTMH purchases, enjoy consultant perks (like convention, album retreats, bulk items, great training videos, product videos and more)  and preorder new products before the book goes live. As a member of my team you will also get my personal email, home phone and cell phone number to reach me any time you need to and the benefit of my team facebook page where you can ask any question you like, share ideas, get ideas and more. I do team member only videos if I think it will help to see something visual instead of just a verbal answer and more. Pretty good value for just $49 right?! 

I know some of you are now thinking... 
The last 2 cartridges were fabulous but how could they possibly have come out with a third that I "need:?
The answer... take a look for yourself! Check out the photos below and/or the PDF file of the complete handbook HERE and the pictures of the stamp sets below as well:


Oh, did I mention that Close To My Heart will be offering a 32 week video class using this cartridge absolutely FREE??? That's right, 32 episodes packed with information, instruction and ideas using this cartridge! It will start in September and run right through until April!Of course they'll be available to watch any time you wish after that as well.


Get widget