Saturday, November 17, 2012

Christmas in November


Welcome to our Christmas in November Blog Hop where we are showcasing the exclusive Art Philosophy Cricut cartridge which can be purchased exclusively through a Close to My Heart Independent Consultant.

It's hard to believe that it's already November and that the US Thanksgiving is less than a week away. And well, that means, it's almost Christmas! We have created Christmas themed projects for you and hope to inspire you to get started on YOUR Christmas creations.

If you just happened to come to this blog, you should start at the beginning at Lucy's blog - Love 2 Create. If you came here from Lucy's blog - Love 2 Create, then you're in the right place!


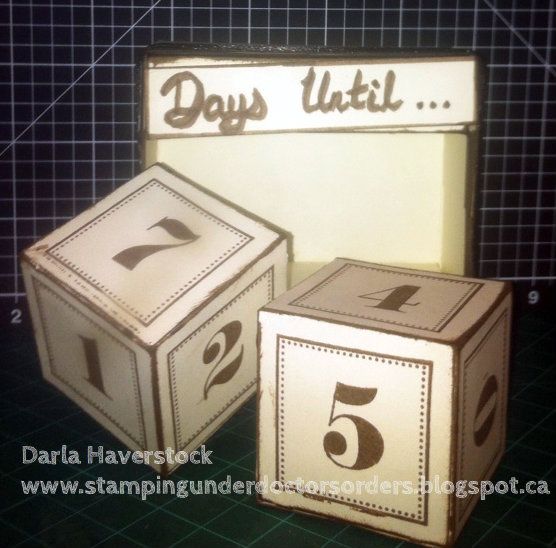
I decided to keep it simple with this one and made gift tags for a few special presents I will give out at Christmas.
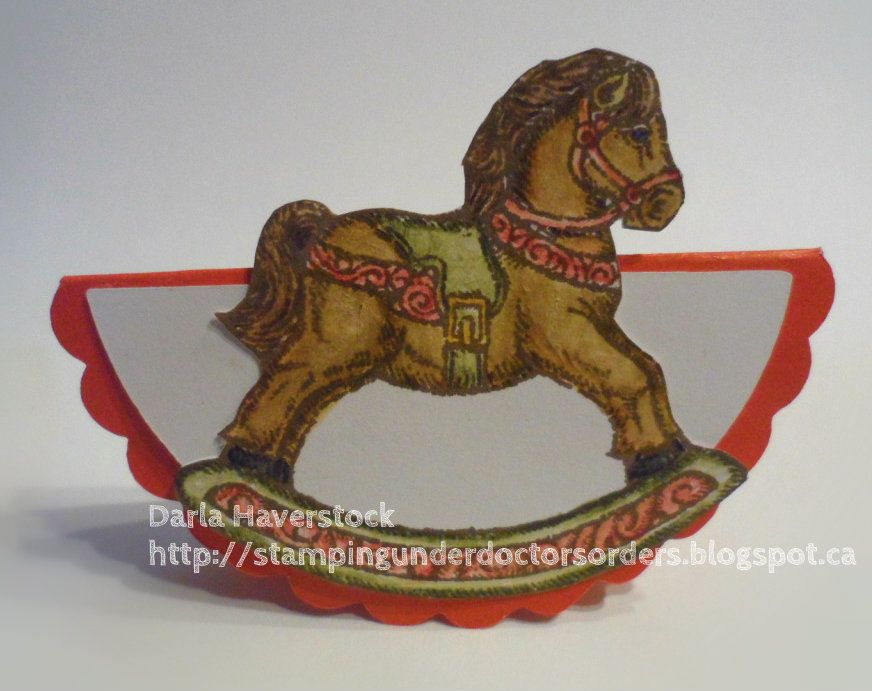
Love that this will actually "rock" if you give it a little tap. :)

I used the card feature from page 69 in the Art Philosophy handbook cut at 3" from Cranberry cardstock for my card base. I used cricut craft room to alter the layer feature from this same page hiding one of the cut lines so it became a solid semi circle instead of a frame and I did change the dimensions on it a bit as well making it a height of 1.194" and width 2.625" and cut it from White Daisy cardstock. I then stamped the rocking horse image from the Christmas Delights stamp set in chocolate ink on white daisy card and used my watercolour pencils to colour it in. I love that this image can be Christmas themed by making it Christmas colours and using it on a Christmas project OR it can be coloured completely differently and used for any other occasion be it a baby shower, birthday, etc. Fussy cut my image (you don't have to cut the section out between the bottom of the horse and top of the rocker piece since your layer from behind would show through here anyways.

I will probably put a little loop of ribbon on these to attach them to presents but I left it off for now as I might not want it for some and it's a lot easier to add it if I want it then it is to take it off. 

Here's a look at the stamp set I used, it is by far one of my absolute favourites!


The next stop on your blog hop fun is Diana ~ Diana's Free Moments.

Products Used:

Here's the entire blog hop lineup in case you get lost along the way:

Lucy ~ Love 2 Create 
Darla ~ Caution: Crafting is Contagious
Diana ~ Diana's Free Moments
Carolyn ~ Nuts 4 Scrappin'
Kindred Hearts ~ It Makes Total Cents
Tammy ~ Closer 2 My Heart
Arlene ~ Arlene's Creative Space
Traci ~ Paper Crafting 101


If you do not already have a Close To My Heart consultant and would like to purchase any of the products or want more info I would be happy to help you out. You can visit my CTMH website to see all of the wonderful products and you will find all of my contact info there as well as a link to find a consultant that may be in your area if you wish to have someone local to you.

Thursday, November 15, 2012

Advent Calendar Blog Hop

Welcome to our second of 2 Blog Hops happening this month. In this Hop you will find that each consultant has created a calendar, we've used different materials and created our own take on advent calendars! Close To My Heart has an Advent Calendar WOTG kit that you can purchase from your local consultant, or you can purchase from from me here

If you just happened across my blog, welcome to our Cross Canada advent calendar hop. I am the first stop in our hop across Canada starting here in Halifax, Nova Scotia. If you started at someone else in the hops blog and are going back around to where you started then you should have come from Teresa over at her blog Country Crafting Mama.

First let me show you how I put my advent WOTG together. I didn't follow the instructions exactly.. although I did follow them more closely than I normally would. LOL

.
I constructed all of my boxes from white cardstock and then cut 2.5" squares from the arious colours of cardstock and stuck them on the fronts. This gave my drawers a little more durability (which is good considering my kids are definitely not gentle with things) and allowed me to use a circle punch on the other side too and instead of having to store this away the other 340 days a year I can simply turn all the drawers the other way and use it for storage in my craft area... or anything else really.. haven't quite decided what I'll do with the other side yet.I'm kind of thinking I'll find a nice photo and cut it to fit the drawer fronts on the other side and then stick them on in the correct order so it displays a tiled picture. Not sure which picture to use though until I decide exactly what room it's going to be kept in.

Here's a photo of a few drawers in the other way...


Now, since the project for this hop was to create an advent calender without using this cubby or to create something other than an advent with the cubby (which I'm planning on but haven't finished yet)... my actual project for today is a perpetual calendar that is also an advent calendar... confusing right?? I know.

See if some pictures help...


Make more sense now? If you can't tell I am absolutely horrible for either bringing Christmas things out on time or putting them away so if I make them fit any occasion then it's not weird to still have it on my desk in July. hahaha

Feel free to skip my ramble on how I made this and go directly to the next stop on our hop over at Michelle's blog My Creations With Michelle

Also, tomorrow is the LAST day to register for mine and Michelle's Christmas Card Making Day so make sure you contact one of us to register is you wanted to attend. It's going to be lots of fun! :)

Basically this is 2 cubes cut from the Artiste cartridge as well as 2 card boxes. I did have to alter the card boxes a bit after I cut them to make them fit this design the way I wanted it to. The cubes are 1.75" and the overall dimensions are approximately 3.75" x 3.75" x 1.8".

I cut a piece of cardstock 7.35" x 7.35" and scored around all 4 sides at 1.8". Then I folded up the sides and glued to make a frame and backing for my calendar. I am going to re-do this one and will use the chocolate cardstock for this piece instead of colonial white.

I stuck my card boxes on the inside of this outer frame creating an empty space in the middle for my cubes.

I cut blank pieces of colonial white to fit the fronts (what would normally be the tops) of the card boxes. When I re-do this I will be putting velcro on the backs of all the pieces for the years, months, my days until, Christmas etc... as well as on the tops of the card boxes to make them easy to take on and off to change them out. In the photos I just used repositionable adhesive, since I knew I was going to re-do it to change the outer frame colour I didn't want to waste my velcro.  I will also type out all the words on them too as it doesn't look that bad in real life but looking at the pictures of my handwriting on the computer I'm wishing I had type it.

The great part is that all the pieces that aren't in use can be stored in either the top or bottom card box. I think the bottom one in the one for myself will end up with post it notes in it. :)

I used the stamp set from the Advent WOTG to stamp the blocks and inked all my edges in chocolate ink.

The ribbon I used to wrap around the outside just to fancy it up a bit more was some old ribbon I had laying around so I have no idea what brand it is, sorry.

As I'm writing up this post I'm also thinking I might have some stamped and cut out holiday images attached to the Christmas countdown pieces just to make it a little more festive but truthfully I really like having some Christmas things around that aren't over the top with Red, Green and covered in glitter although I do like that stuff too don't get me wrong... just not on EVERYTHING!!


Your next stop on the Cross Canada Hop is Michelle S from My Creations With Michelle

Here is the entire lineup in case you get lost along the way. You will also find this list on Michelle's blog
  1. Darla - Caution: Crafting is Contagious
  2. Michelle S - My Creations With Michelle
  3. Sheri - Sheri Says Just Scrap It
  4. Michelle M - Twirl 'n Time
  5. Teresa - Country Crafting Mama

Thanks for hopping along with us - we hope we were able to inspire you to create your own Advent Calendar using some of the designs and products seen along the way. Join us again on December 15th when we showcase a 3D Christmas themed project from the New Artiste Cartridge.

Saturday, November 10, 2012

Capture The Date Blog Hop


Welcome to our November Stamp of the Month Blog Hop! This month Close to My Heart is offering a stamp set called "Capture the Date" throughout the month of November. This versatile set can be purchased exclusively through a Close to My Heart Independent Consultant for only $5 with a qualifying purchase of $50. (That’s a $17.95 value!)

We are also proud to announce that Close to My Heart wants to help those affected by Hurricane Sandy. To show our support of Red Cross relief efforts for those areas of the US severely affected by Hurricane Sandy, Close To My Heart will donate $1 for every Stamp of the Month set sold as a part of this promotion during November.


In this hop, you will see projects featuring this fun stamp set from many talented crafty ladies! Enjoy our blog hop. 

If you have just hopped onto my blog, please start at the beginning at Lucy's blog – Love 2 Create. If you came from Lucy's blog – Love 2 Create then you are in the right place!

Given that tomorrow is Remembrance Day, I decided to use this set to make a card to give to a few veterans we know well, as well as a few to tuck in my bag for any veterans we see selling the poppies around. My husband is in the Navy, father-in-law served in the Air Force and numerous other family members serve(d) in the military as well (both Canadian and US) so this is a very important one for me.

If you are one of the countless military people serving now or served in the past than "Thank You!" this card is for you. 

I'd also like to take a moment to say thank you as well to all the families that help support these men and women from home, I saw this posted on someones facebook (which I immediately shared on my own as well), and I will share it here as well so you understand how I feel towards you the supporting families:

"I wear no uniforms, no blue or army greens.

But I am in the Military in the ranks rarely seen.

I have no rank upon my shoulders - salutes I do not give.
But the military world is the place where I live.
I'm not in the chain of command, orders I do not get. 
But my husband is the one who does, and this I cannot forget.
I'm not the one who fires the weapon, who puts my life on the line.
But my job i
s just as tough. I'm the one that's left behind.

My husband is a patriot, a brave and prideful man.
And the call to serve his country not all can understand.
Behind the lines I see the things needed to keep this country free.
My husband makes the sacrifice...but so do our kids and me.
I love the man I married. Soldiering is his life.
But I stand among the silent ranks known as the Military Wife ♥"


Of course no remembrance day post would be complete without "In Flanders Fields" being recited now would it??

In Flanders fields the poppies blow

Between the crosses, row on row,

That mark our place; and in the sky
The larks, still bravely singing, fly
Scarce heard amid the guns below.

We are the Dead. Short days ago

We lived, felt dawn, saw sunset glow,

Loved, and were loved, and now we lie
In Flanders fields.

Take up our quarrel with the foe:

To you from failing hands we throw

The torch; be yours to hold it high.
If ye break faith with us who die
We shall not sleep, though poppies grow
In Flanders fields.

- John McCrae


Given the importance of this holiday I am also including the Cricut Craft Room file for this project and the instructions in case any of you out there want to make this as well, and you can find it here in the cricut project center. If you need help on what to do with this file after you've saved it somewhere on your computer please see my video on Importing/exporting files in CCR


All of the white is 1 piece with the exception of the "Thank you" tag piece tucked in.
You will need to line it up with the fancy edge piece at the 0 mark and score it at 1.25" and again at 3.75"

Here is what is in the file as well as the folding diagram and how I made the poppy.

Cut slits partway to the center like I have indicate with the scissors and --- marks on the diagram.

Place front side down on a foam mat (the back of a versamat works wonderfully, or you can use a mouse pad) and using an embossing stylus (preferrably a large one) rub the backs of all the petals and they will cup up around your stylus... then turn it to the front and press your stylus down in the middle of the flower causing the 4 petals to lift up around the center. Please ignore the fact that my poppy already has glue on the back in this step.. I forgot to take the photo before I actually did the next step.

Now cup all 4 petals up in your hand and turn over.

Put glue all around the center on the back as shown and let it dry like this... This will keep the petals from laying flat again.

Glue your black center on the front.


I cut black panels at 3 3/4" square for the inner part and another piece 3 3/4" x 2.25" for the front. You could cut the inner piece shorter to save cardstock if you wanted to since you can't actually open the card to see all the way to the fold line once it's assembled.

Apply glue were I put the blue lines on the photo below. Fold closed. Now glue your smaller black panel on the front and glue/fold your decorative flap down. Sorry I forgot to take a photo of this step before I stuck it down.


I stamped the "november" and "1" "1" from the Capture the Date stamp set on the decorative flap. 
I also used the label or tag image from this set to stamp on the smaller piece of white card that is in the file (this cut can be found on page 47 of the Artiste cartridge and the size is indicated on the carrier sheet for the stamp set). The "THANK YOU" is from a set available only to consultants that I masked off the rest of the sentiment but you could really use individual letter stamps here, handwrite it  or use any other thank you stamp you have that fits. 

Now I am also including a picture tutorial on how I got the poppy flower shape from the Artiste cartridge... Let me know what you think of this type of tutorial as I bought a new screen capture/editing software to allow me to do this much easier. :) If you're more of a video person you can look at the picture tutorial and then go watch my video tutorial on Basics of Cricut Craft Room and Hide Contour.


Your next stop on our Capture the Date blog hop is Jennifer over at 4 Hearts Scrapbooking.

Products Used:
Here is the complete lineup in case you get lost along the way:

  1. Lucy ~ Love 2 Create
  2. Darla ~ Caution: Crafting is Contagious
  3. Jennifer ~ 4 Hearts Scrapbooking
  4. Theodora ~ Celebrate Crafts
  5. Stephanie ~ The Quilted Scrapper

Thanks for hopping along with us - we hope we were able to inspire you.

Monday, November 5, 2012

Christmas Card Blog Hop


Welcome to our first of 2 Blog Hops happening this month. In this Hop you will find that each consultant has created 3 Christmas Cards using non-Christmas paper! They were given the challenge to create these 3 cards using either cardstock or another paper packet of their choice.


If you have just hopped onto my blog, you can start here as this is a circular hop, but if you want to follow us across Canada then please start at the beginning and join Deanne in NewFoundland at Treasured Heart. If you came from Stephanie - Stephanie's Creations then you are in the right place!

Now anyone that knows me knows that I really don't use a lot of patterned paper on my cards. I tend to just layer plain cardstock or stamp my own pattern/background. I really wanted to show the versatility of our paper though for this hop so I used patterned paper on 2 of the 3 cards I made. I actually like the 2 with patterned paper better than the one without in the end. :) I'd love to know what you think.

Here's the first one I made.

I used the Dakota paper pack for this one. I cut my door panel to fit 3 1/2" x 5 1/2" and my card base is a piece of Slate cardstock 7 3/4" x 5 1/2" scored at 4 1/4". I cut 4 more pieces of Dakota for the panels and scored a 1/4" border on the panels.Then I used some whisper ink to distress the edges of all the pieces. I could have used a branch shape from either of the cricut cartridges but my poor punches have been feeling so neglected since I got these cartridges so I used my MS punch to punch out the branches from Olive cardstock and formed into a wreath. I crumpled the branches a bit before glueing them down too to give it some dimension. I used some Red Glitter Line from Viva Decor to add some berries to my wreath. I could have used a font stamp set to stamp my sentiment down the side but decided to hand write it instead (I really wish I would have stamped it though as it would have looked much cleaner). You could use any sentiment here and doesn't have to go vertical either.  Oh the panels are up on foam tape too so this actually has a lot more dimension then the picture is showing.


The second one doesn't use any patterned paper at all...

It is really much nicer in real life as the sentiment and the train is embossed in gold embossing powder so it really shines. I used Cranberry and Olive Cardstock and alcohol markers on this one. I embossed the main panel with a dot pattern but left a section in the middle plain to stamp my sentiment.

Here's another view so you can see the glimmer (but can't see the colours or the dry embossing as nicely..

Now for my 3rd card I actually have 3 different versions of it to show you as I really liked this one and could not for the life of me decide which one to stick with so I made them all.. The paper I used for these is Florentine.

Version 1:
Version 2: (my favourite)
Version 3:

I should mention that I actually made 6 versions... but the other 3 looked the exact same when I photographed them so I didn't bother to show you those too. The other versions were the exact same but instead of all the layers just being put on top of each other so the middle piece is on top I had cut them on the cricut so the other version of each of these were done as frames and the center image was on the card base and the other layers were laid on top from smallest to largest framing each layer underneath it.

I also thought these would look wonderful with a sentiment in the center instead of this image or any other image (the train from my 2nd card would be wonderful done in some blue and green tones for this... possibilities are endless!! Since this hop was technically only supposed to be 3 cards (versions don't count though right?!? LOL) I figured I'd save my other "versions" of this one with different colours, sentiments, papers, etc for another day. :)

To make the frames I simply decided what size I wanted all my layers to be in cricut craft room and put those sizes of rectangles centered within each other on the mat. First I did all my white layers together and cut then all my patterned layers and cut ... of course I then cut the sizes I had intended for my white layers from patterned and vice versa too since I really liked the different possibilities. Also, by doing it this way all the layers were cut from a card fron size piece of paper instead of cutting full layers on my paper trimmer and making it heavier to mail and use up more paper. :) Yay for light weight, multi-layered cards that don't use a ton of paper!!

Alright... enough from me..

Your next stop on the Cross Canada Hop is Michelle S - My Creations with Michelle.

Products Used:

Here is a complete list of the blog hop in case you get lost along the way:

Thanks for hopping along with us - we hope we were able to inspire you to create your own Christmas cards using some of the designs and paper seen along the way. Join us again on November 15th when we showcase our versions of Advent Calendars.

Friday, November 2, 2012

Halloween pictures

As promised... Here is a picture of my kiddos all ready to go trick or treating.

  
Get widget